JoZeF
Grave Digger
Joined: 25 May 2007
Posts: 1734
|
 Posted: Wed Sep 12, 2007 2:34 pm Post subject: Kustombarts' Metalflake How-to !!! ! !! ! Posted: Wed Sep 12, 2007 2:34 pm Post subject: Kustombarts' Metalflake How-to !!! ! !! ! |
 |
|
A big Thank You to Bart for this Kick ass Metalflake tutorial !!! this Topic is locked to avoid pollution. If someone has a question about 'Flaking, please open an appropriate topic where your queries can be debated. Thanks !
If you want to see more flakes, visit www.kustombart.com
Hi, this is your old friend Kustombart, with another Special Paint Adventure for all you thinner-sniffing kids. This time, we will be focusing on flakes. I will describe the way I do this kind of job. No doubt when you ask another painter you will get a different story but this is my way and the best way, so pay attention! I use PPG Deltron paints throughout, from primer to clearcoat and everything in between. Only the Kandy Koncentrate and the Flakes come from Metalflake co. http://www.metalflakecorp.com
First off, I want to say that Flaking is not for beginners. Anyone who wants to attempt this must have some experience in handling car paint and car painting apparatus. Also, you need a decent air supply (up to 3 bar and enough litres/minute for your paint gun), standard car painting supplies like tack rags, cleaning thinner, gloves, A GOOD BREATHING MASK etc.
Furthermore, paint in a place which is out of the sun, rain and wind, as clean as possible and with a flow of clean air. Also, you must have enough room to move around the object with your paint gun.
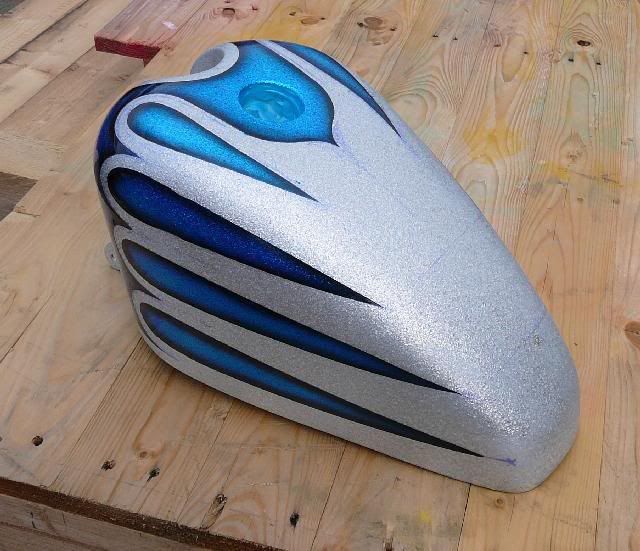
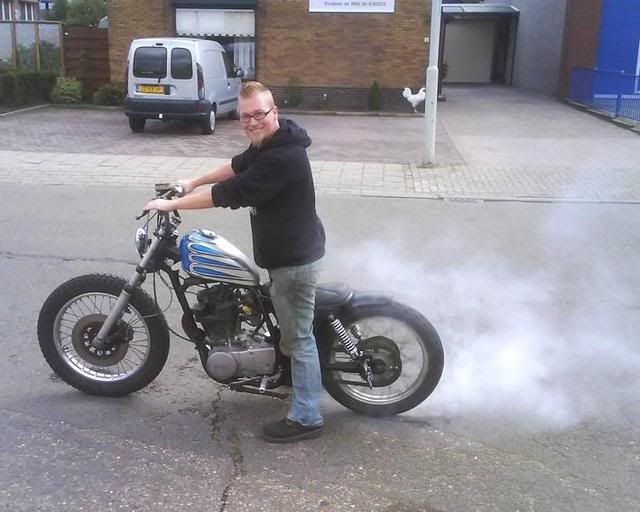
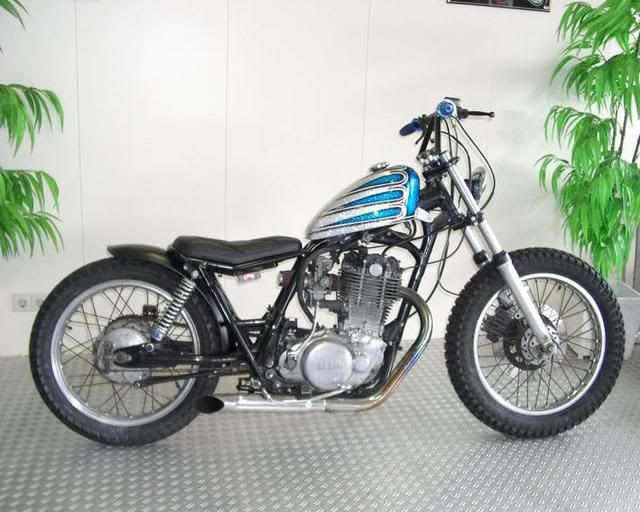
For this tutorial, I will do a petrol tank for a SR500 Bratstyle chopper, built by a friend (who will be named Matt Black for this purpose).
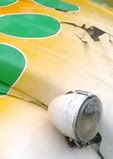
A sketch was made on the tank together with Matt to agree on the idea of the design. He also chose the colours, which will be silver flakes with light blue scallops. The blue colour will have to match his blue dot headlight and blue flaked handlebars.
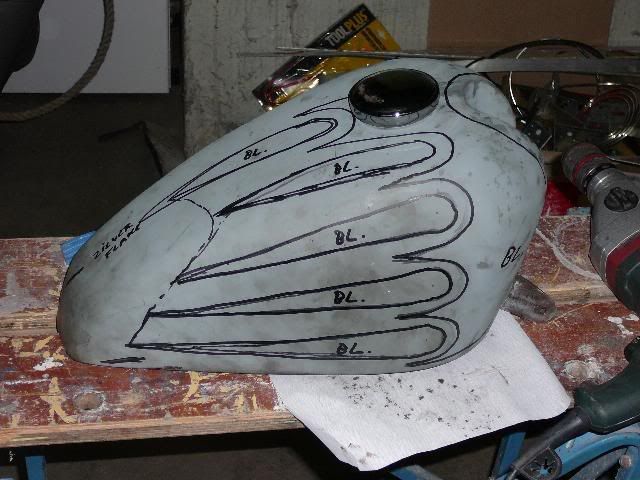
The tank has been fabricated/adapted by Matt to fit the backbone and oil filler cap of the SR500 so there will be some filler involved to remove minor welding and metal shaping defects. After that, spray filler/sealer will be applied to cover up old paint and filler, create a smooth surface in a neutral colour and seal any chemicals from filler under this layer.
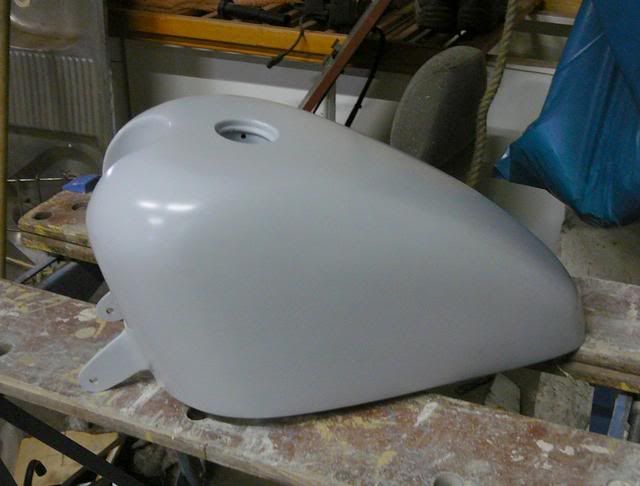
After sanding the spray filler with 600 grade wet sandpaper and degreasing the surface, we are ready to flake. Usually I spray a colour which matches the colour of the flakes first but the primer grey is so close to the silver I will skip it this time.
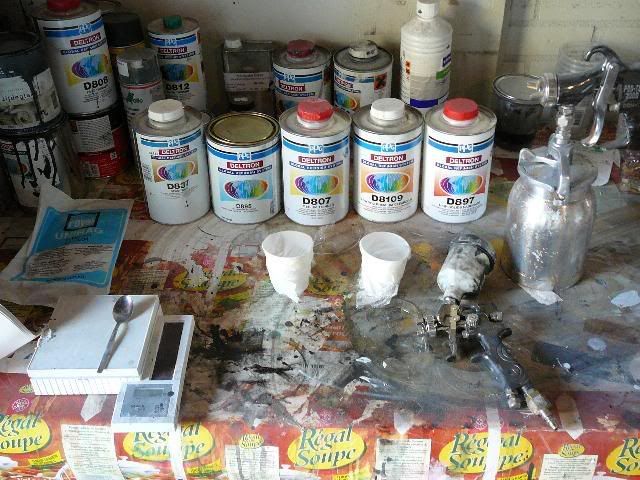
For the flaking we will need:
-300ml PPG Deltron D895 basecoat binder (clear)
-300ml D808 Fast thinner
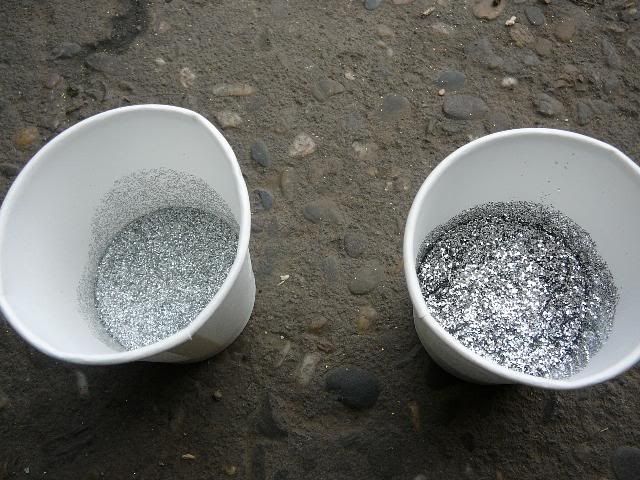
-10 grams silver Metalflake Micro flakes
-10 grams silver Metalflake Glowble flakes
-100ml D8109 HS clear
-33ml D897 HS hardener
-15ml D807 Medium thinner
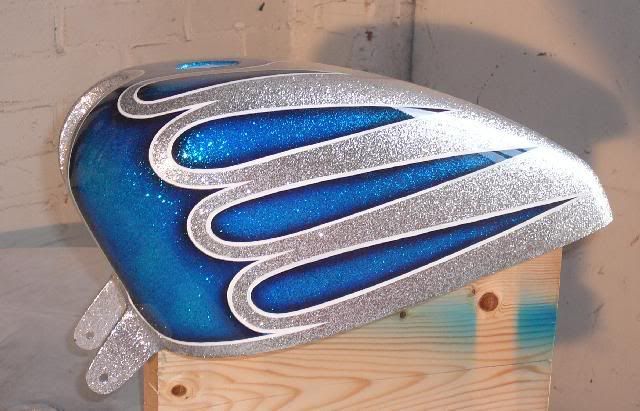
Here you can see the difference between normal flakes and the big Glowble flakes.
Notes:
-I use clear basecoat with fast thinner so I only have to wait 15 minutes for one layer to dry before I can do the next. You can also mix the flakes with any 1K or 2K clear or even with a (transparent) colour.
-I mix about 10grams of flakes in 100-150 ml of clear, then add thinner. Use more and you will clog up the gun, use less and you will need more layers to get the same coverage.
-I use a High-Solids clear to build maximum layer thickness to cover up the flakes. If you use a medium solid clear you will need more layers of clear to get a smooth finish.
-For maximum effect, I use small flakes first, then cover them with big ones. This way, the small flakes create a rough surface. Big flakes will land on the rough surface lie at angles in stead of flat on the surface. This way the light catches the flakes better. Sparkly, sparkly!!!
-Drying times that I mention vary with temperature, humidity and airflow in the room so use your common sense to adapt them to your own circumstances. During painting I had good ventilation, about 22 degrees C, dry weather and a 200 Watt spotlight on the tank.
Also you need a Suction-feed spray gun with a nozzle of 2 or 2,2mm and some marbles. I use a Pro-tek gun, shown on the far right of the picture. A gravity-feed gun will not work because the flakes will all sink to the bottom and clog up the gun. I also use a gravity-feed Pro-tek gun with a 1 to 1,6 mm nozzle for clearcoating (shown in the foreground of the picture).
So, here we go.
-Mix up 100ml of D895 clear basecoat with 100 ml D808 fast thinner.
-Add 10 grams of flakes
-Stir well and pour into the paint gun
-Add some marbles or nuts and bolts and keep shaking the gun during painting or the flakes will sink to the bottom and you will only spray clear.
-Set the pressure to 2.0 bar or as low as you can go while maintaining a nice spray pattern. (The higher the pressure, the more flakes will bounce off the surface and end up on the floor, in your hair, etc.)
-Spray one layer, in nice, even bands, overlapping 50%. The coverage will not be so good after the first layer. You can still easily see the colour underneath. Be careful not to spray too much in one go. Spray too much and the paint (with flakes in it) will sag.
-Wait for about 15 minutes until the paint is still sticky but doesnt stick to your finger anymore.
-Apply the second layer like the first. If possible, spray at 90 degree angle to the first bands, to get even coverage.
-Leave to dry for another 15 minutes
Note: The final bit of paint will not come out of the gun, because it is suction feed but it does still contain a lot of flakes. I usually mix up another 50 ml of clear basecoat and 50 ml of fast thinner and add that to the cup to get out as much of the flakes as possible.
-Rinse the gun with cleaning thinner
-Mix up another 100ml of D895 basecoat clear with 100ml of D808 fast thinner
-Add 10 grams of Glowble flakes
-Spray another layer like the first two.
-Wait again 15 minutes
-Spray final layer or continue until you get the coverage you want, each time waiting 15 minutes between layers.
-Wait for about an hour after the last layer until all the thinner has evaporated.
-Gently push down flakes that are sticking out of the paint with the back of your (clean) hand.
-Mix up 50ml of D8109 High Solid Clear 3:1:0,5 with D897 HS hardener and D808 fast thinner.
-For this small tank I use a gravity-feed touch up gun with a nozzle of 1mm at 2,3bar pressure
-Spray several layers until paint is finished, each time waiting about 15 minutes between layers.
-Clean your equipment
-Relax and have a beer and a smoke for 20 hours.
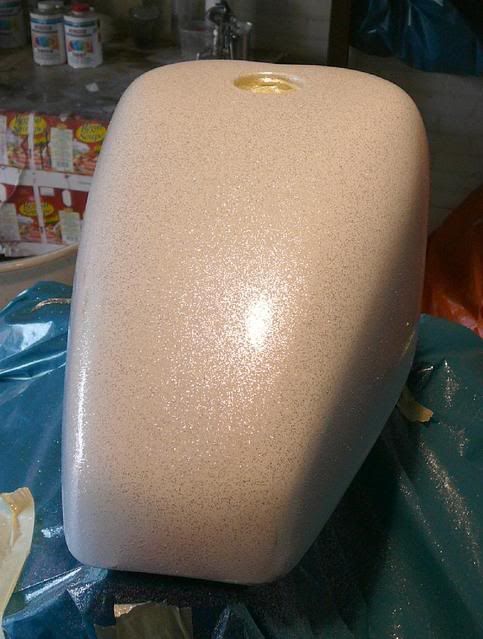
Coming back to the paint booth, you will notice that every surface is covered in flakes. Be sure to clean this up because they will become airborne at some point and probably land on some wet paint.
And then, sanding starts.
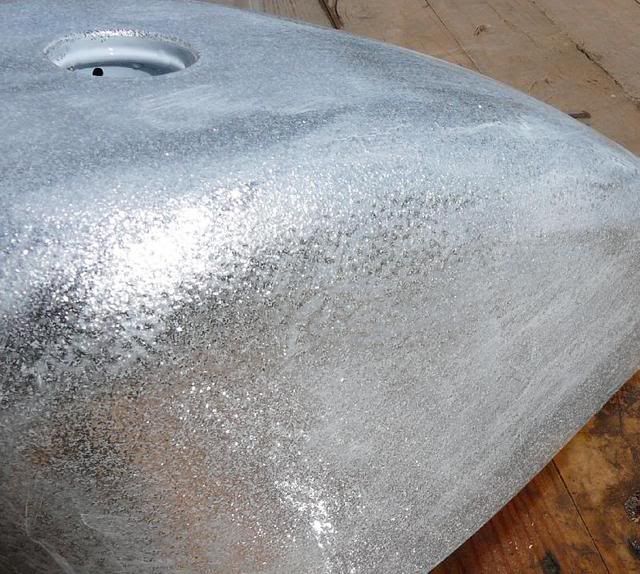
-Use 600 grade sandpaper with lots of water to lightly sand the clear until you have a rough enough surface for the next layer of clear. Be careful not to sand through the clear because you will end up sanding the colour off the flakes. With silver flakes you will not notice so much but coloured flakes will turn grey.
If you have this problem, mix up a Kandy (transparent) colour to match the colour of the flakes and use a brush to touch up the grey specks in your flakejob.
-After sanding and touching up your mistakes, apply 2 to 3 more layers of HS clear, with flash times of 15 minutes in between layers.
-Do not spray more than 3 thick layers at one time.
-Have some more beers and smokes for 20 hours.
-Sand again with 600 wet paper until you have a more or less smooth surface.
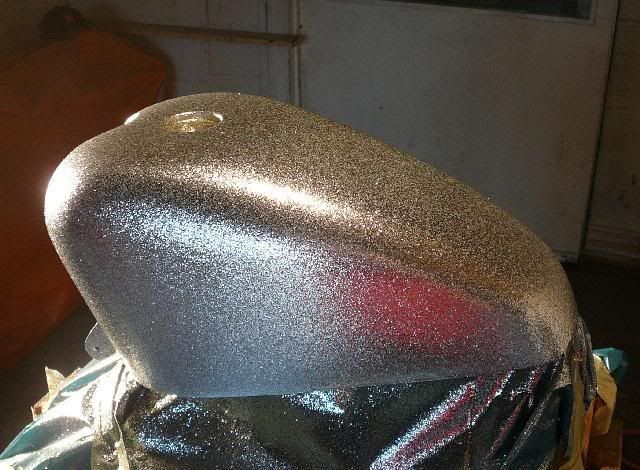
- If you think you have sanded enough, dry the surface and check for spots that are still shiny. Everything has to be matt, then you know you have a smooth surface (see picture).
In the picture you can see parts where the paint is still shiny. Some more sanding is needed.
For the next step, I will add Kandy scallops. If you dont want this, skip until the last clearcoat!
If you lay out scallops, be sure that the proportions are correct. For example, the distance between the scallops, width of lines etc. I tape off certain key points, like the ends of scallops or the beginning. This way I can be sure that the design follows the line of the tank. Keeping in mind also disturbances like the filler cap. On these guide-pieces of tape, I measure the distance I have and divide that by the number of scallops I want to paint. Now I know how much room I have for each scallop. I mark that on the tape and work out how big the space between the scallops will be. I also mark that off.
Now I draw the scallops and start to adjust the shape until I like what I see.
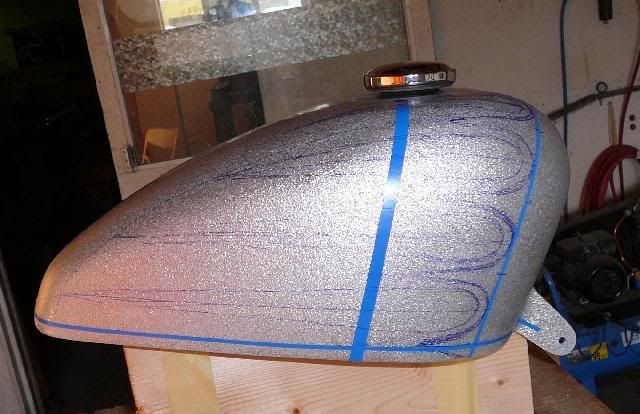
When I find a design I am happy with, I tape it. Make sure to tape flowing lines and that the tape is flat on the surface. Do not stretch the tape to much as you are laying it down because it will come loose in tight corners.
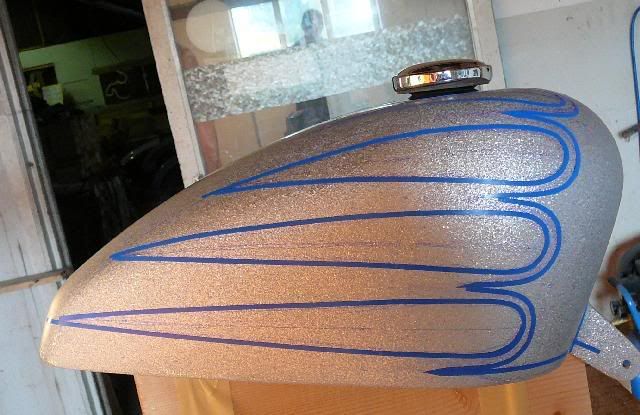
If thats done, press down the tape with your fingernail to make sure there are no air bubbles under it and that it sticks to the tank properly. Next, fill in the areas you do not want to paint with wider tape. Tape in a straight line and cut out the shapes with a sharp knife in the middle of the blue tape. Do not cut too deep because you will cut through the blue tape into the paint and cause the colour to bleed through.
Once this is done, degrease the surface again and wipe with a tack rag to get rid of dust particles.
Now I will mix the blue Kandy. We need:
-50ml of D895 clear basecoat binder
-50ml of D808 fast thinner
-5-10 ml of Kandy concentrate Royal blue
The mixing rate can vary, according to the intensity of the colour you are trying to create. If you add little Kandy Koncentrate, you will need many layers to get a dark tint. I check the colour by sticking a spoon in the paint, taking it out and checking it in the light. Do not mix more than 20% because it will affect the qualities of the clear.
And now for the spraying:
I use my Protek touch up gun with 1.0mm nozzle at 2,3 bars pressure. First I spray 2-3 even coats of blue. It is vitally important that you get even coverage; otherwise there will be light and dark stripes. So, in larger areas, spray one line, then the next, overlapping by as much as 75%. Try to spray as robotic as you can to get an even thickness all over the surface. Remember, thicker paint means darker colour.
For this reason I mix my colours light. This way I can spray many layers to get my colour and I can correct mistakes more easily. Because you can always add more Kandy but you can never take it away. Spray as many layers as you like to get your basic colour. Spray one layer horizontally, and the next vertically, this way you get the most even coverage.
When you are satisfied with the colour, you can begin your fades. I use my airbrush for this because I have much smaller spray pattern and I can control the amount of air as well as the amount of paint coming out of the gun. I use an Iwata gravity feed gun with a 0.3 mm nozzle.
For airbrush use, I add a little bit more thinner, because the nozzle is so small. Also, make sure you strain the paint, or the gun will clog up and splatter paint on your paintjob!
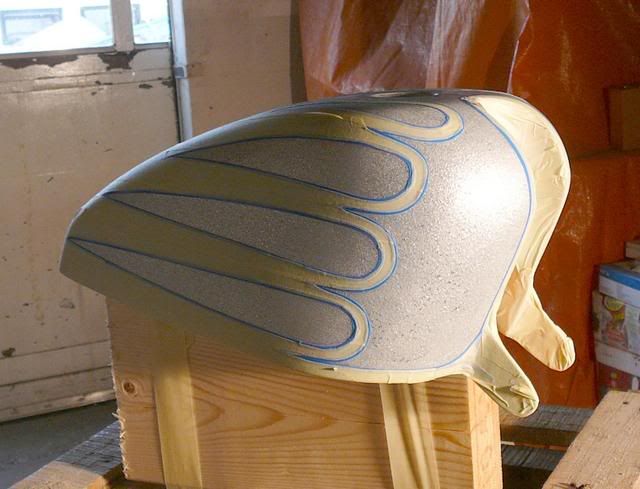
Spray thin lines around the edges, keeping the centre of the spray pattern on the tape line. Keep spraying until it is dark enough. You can also add a little black basecoat paint to darker up the fade. And here is the result.
Pull the tape as soon as you are finished. This way, the paint edges have a chance to lie down and flow out a little, while they are still wet. After pulling the tape, wait about an hour until the basecoat paint has fully dried, the clean the whole tank with degreaser to get rid of any tape glue/residue. Use thinner and a q-tip to carefully remove any paint that has bled through the tape and clean up the edges, where necessary.
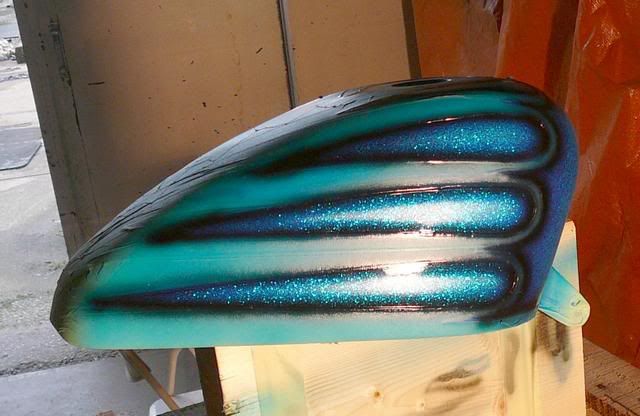
Mix up another 50ml of HS clear with 50ml hardener and 25ml thinner and spray a thick layer of clear on the motherf****r.
Add pinstriping around the edges of the scallops.
Cover that up with clear, sand again and tape up the underside of the scallops. We will create a shadow under the scallops so it will appear that they are floating above the tank surface.
For this, mix up some basecoat black with a lot of thinner so it becomes transparent. Fill up your airbrush and build a shadow, layer by layer.
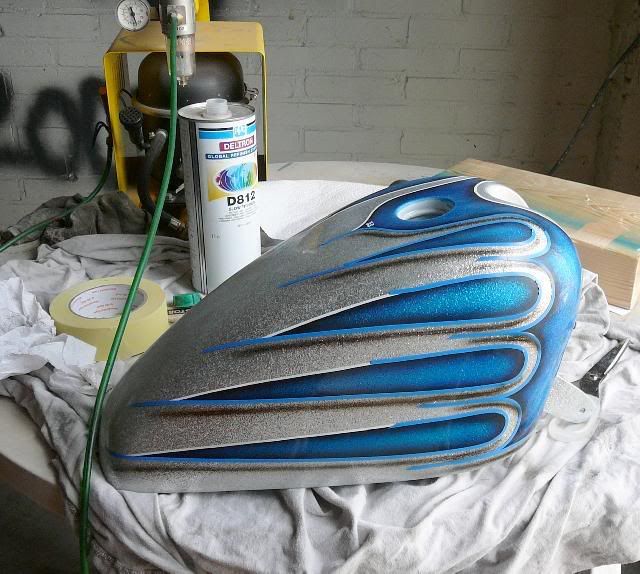
Pull the tape, spray another coat of clear.
Finally, for the mirror-finish, we sand and polish the tank.
I use 1000 grade wet sandpaper with a lot of water to sand until the clear is completely matt. No shiny parts left. Then I repeat with 1500 grade, 2000 and 2500.
Next, I switch to a rough polishing compound. Polish till my arms fall of then, using my feet, polish with a fine compound until my feet fall off.
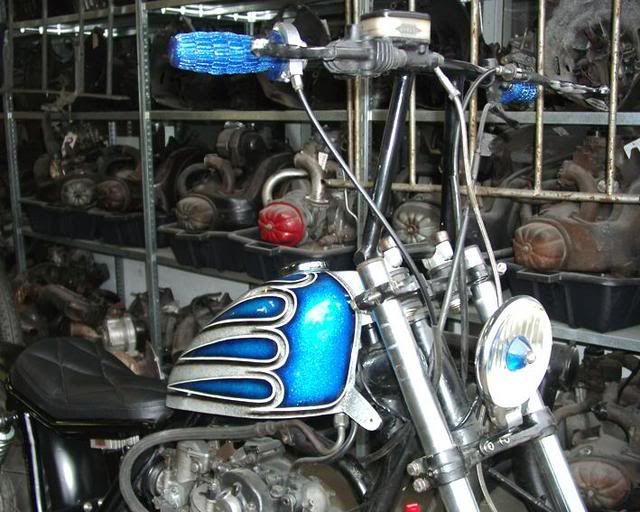
Then, using my nose, I telephone my friend to come and pick up his tank. He then mounts it to his motorbike.
He waits for two weeks after the last layer of paint before applying wax to the tank. He is very careful with petrol the first two weeks because it can soften the paint. So no spilling until there is wax on it.

_________________
"That bumper fits there like sunglasses on pig"  O.E. O.E.
 |
|


